
Since announcing this year’s Mochimochi Photo Contest, I’ve found myself checking the Flickr pool more frequently to see what’s new. This morning I am drawn to this cute Tiny Chicken by dhaus11!
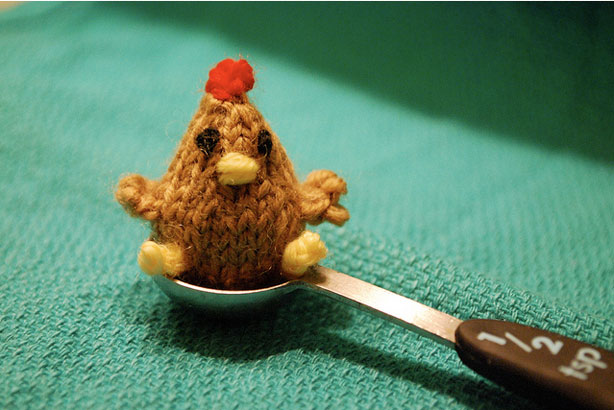
The photo is adorable—I love the bright background and the simple prop of the 1/2 teaspoon. And what makes the photo really work is just the simple fact that it’s in focus!
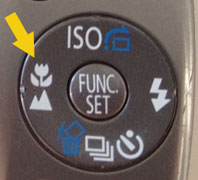
Especially when photographing tiny knits, making sure they’re in focus is key. Most point-and-shoot cameras have a macro setting that works great for close-up shots—on my camera, the icon for this setting looks like a tulip.
(Of course, this photo isn’t in sharp focus because I took it with my phone!)
Other things you can do to make sure your photo isn’t blurry is to take it in bright natural light, and to steady the camera on something (it doesn’t have to be a tripod) as you push that button. If you can get your camera in place so that you don’t have to hold it at all, you can also use a timer, which will take subtle hand movements entirely out of the equation.
If you have other tips for taking good, in-focus photos, please share them in the comments!
(By the way, the pattern for Tiny Chicken is available for free on the CRAFT blog!)
That is an excellent photo.
I find that there are certain settings above and beyond the macro setting that make it easier to take better photos. For me that usually involves (especially for the toys) using the portrait settings. It feels silly, but it helps me at least keep the face area in sharper focus.
That is osso cute! dhaus11, should get some congrads! Ms. Hrachovec, you should give people with pix like that prizes!
Great photo! This will be my second project. I knitted my first bunny the other day! Thanks for all the free patterns!
One helpful thing is simply to take a million photos with different settings, in slightly different light, different angles, etc., and then look at them all on your computer. With a digital camera you can just delete anything you don’t want to keep, so you’re not wasting anything. I find it’s easier to to take a lot of good shots than to try to get one perfect shot – because even with practice and learning all the different settings on your camera, sometimes the light or the color of your object will affect how it turns out on a big screen (not just your little screen on your camera), and you can end up with a totally awesome shot by accident.
Another big thing is avoiding direct full sunlight, which washes out the colors and creates too much shadow (which hides a lot of the great stitchy details). My favorite light is either outdoors on a slightly overcast day (or with both the camera and the subject in the shade), or the same light indoors with a broad-spectrum light (like an Ott light) coming from the opposite direction that the sunlight is coming from. The colors turn out really true both of those ways.
aww this is aewsome !!!! how do you make them, i dont even kno how to sew.! :)