
For a lot of knitters, seaming finished pieces together is their least favorite part of of a project—it’s time-consuming and can turn out so ugly. But for those who have joined the cult of mattress stitch, the technique of sewing pieces together on the right side for a virtually invisible seam, finishing is a relatively effortless and almost magical process. Mattress stitch is also a very handy skill for making great looking knitted toys.
There are several good mattress stitch tutorials on the web, but since there are some specific issues with seaming toys that aren’t found so much in garment knitting, I thought it might be helpful to do a toy-specific tutorial on the techniques. In this post, I’ll cover the basic “flat” seaming: vertical, horizontal, and vertical-to-horizontal mattress stitch. Then I’ll demonstrate how to use mattress stitch to sew on a 3-dimensional limb, such as an arm, and also how to sew on a limb at an angle. (I’m not going to do any techniques for garter stitch, since I rarely use it in my toys.)
Vertical Mattress Stitch
Vertical mattress stitch is used to join the edges of two pieces together when the knitting is running the same direction on both pieces . Among Mochimochi Land patterns, Grass, Evolving Punk, andLuvgun call for this basic stitch.
Start by placing your two pieces side by side with the right sides up. For toys, you will actually often start by holding the pieces together with wrong sides facing each other, but the technique is exactly the same, and easier to demonstrate when laid flat.
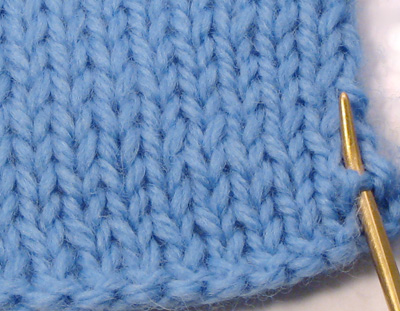
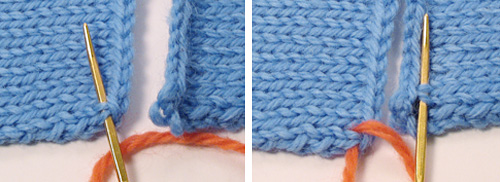
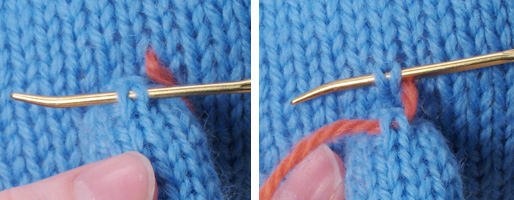
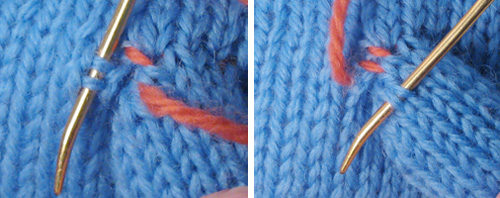
Insert your tapestry needle under the horizontal bar between the first two stitches on the edge you want to join.
Pull the yarn through and slip the needle through the opposite horizontal bar on the other piece.
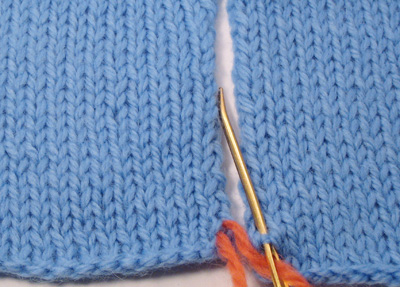
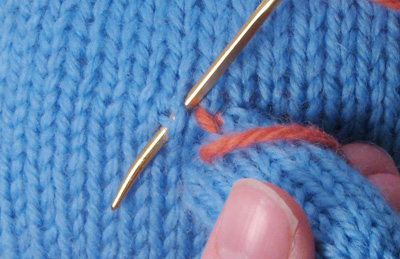
Continue to go back and forth under the horizontal bars along the seam.
Now for the magic: pull on the yarn to tighten up your stitches…
And they disappear entirely! No matter now how many times I see that, I still ooh and ahh at the trick.
So that’s the basic mattress stitch, and it’s beautiful. But what if you need to seam around all of the edges of the pieces, as with many toys? When you get to the top of the knitting, you can simply turn the corner and seam the top of the knitting together with horizontal mattress stitch.
Horizontal Mattress Stitch
This stitch is used when you are seaming together the cast-on or bound-off edges of two pieces of knitting. If you’ve just finished vertically seaming up one side of the knitting, just turn the corner and continue with horizontal mattress stitch. (It will look pretty strange at first, but when you tighten up your yarn, the seam will disappear.) Horizontal mattress stitch is also used when sewing up the holes between the feet or ears of animals, as in the Mochimochi Reindeer.
For clarity, I’m again demonstrating this technique with the knitted pieces side by side, though with a toy you would normally be holding the pieces together with the wrong sides facing each other.
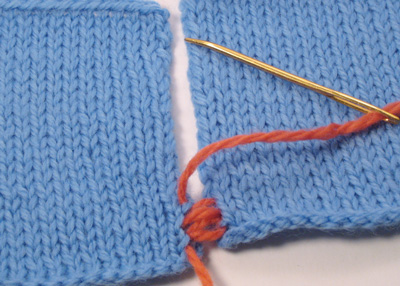
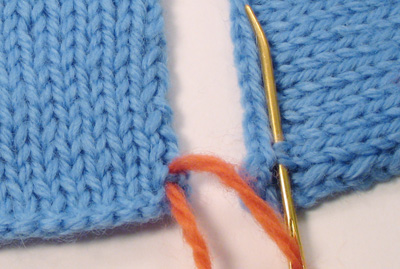
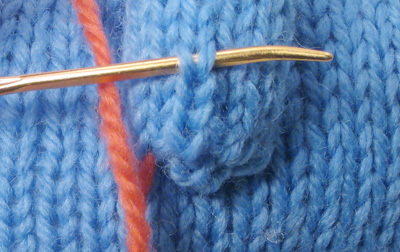
Insert your needle under the point of the V of the first stitch. Pull the yarn through, and do the same with the opposite stitch.
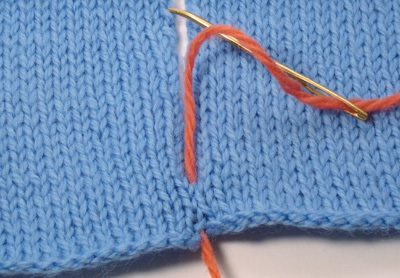
Continue back and forth across the edges, tightening up your yarn a bit after the first few stitches.

Here’s a photo of our square seamed together all around the sides, using vertical and horizontal mattress stitch. Since you’re sewing on the outside of the knitting, you can stuff as you go before closing off. (On a side note, if you’re using safety eyes, remember to attach them before closing off.)
Vertical-to-Horizontal Mattress Stitch
Sometimes, you need to seam together two pieces with the knitting running perpendicularly. This occurs in the pattern for Tubby, for example.
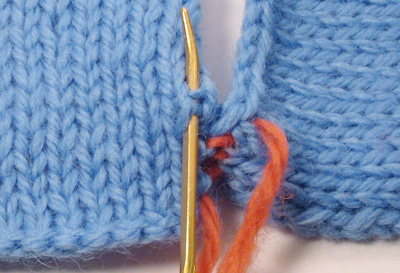
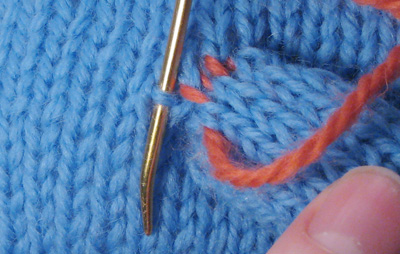
The technique, as you might expect, is basically a combination of vertical and horizontal mattress stitch. Insert your needle under the horizontal bar of one piece, then under the opposite V of the stitch in the other piece.
However, since rows of knitting are slightly more compact than horizontal stitches, they usually won’t match up with a perfect 1:1 ratio, and you will need to make some adjustments as you go along the seam. This is best done by occasionally inserting your needle under two horizontal bars at once.
There isn’t an exact formula for how often you will need to insert your needle under two bars instead of one to make the two pieces match up; you will need to eye it for yourself as you go along. This can seem a bit tricky, but the good news is that the seam will again be virtually invisible once you’re finished, and you shouldn’t be able to tell where you made the adjustments.
Sewing on a Limb (perpendicularly)
Above, we have seen how mattress stitch can make beautiful seams when joining flat pieces together. It’s even more of a lifesaver when attaching limbs (arms legs, ears, etc.) to a toy. Again, it’s almost invisible, and it also makes it easy to sew on limbs at any angle.
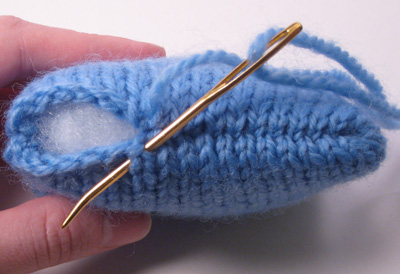
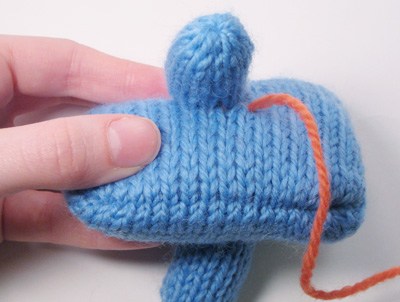
Let’s attach an arm to our square, which we’ll now call the toy body. First, decide where on the body you want to place the arm.
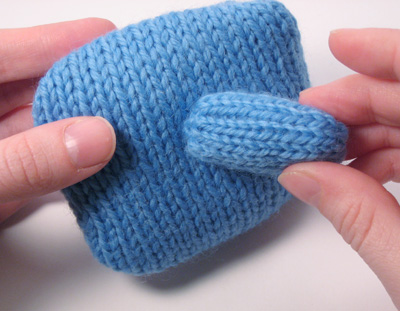
You’ll see that some of the stitches on the arm line up with the horizontal stitches on the square. That’s where I like to start seaming, using horizontal mattress stitch.
Soon, the stitches stop lining up, and you have to turn a corner, so to speak. Insert your needle under one side of a stitch on the body, and up through the middle of the stitch immediately below it (or immediately above it, as the case may be.)
The next few stitches will line up vertical-to-horizontal, so continue with vertical-to-horizontal mattress stitch.
You’ll then turn the corner again, and switch back to horizontal mattress stitch. Continue to seam around the circumference of the arm until you arrive at where you started. You will end up with an arm that is sticking straight out.

Sewing on a Limb (at an angle)
Not all knitted toys want to hold their arms straight out. Some want to have them down at their sides, or reaching upward, or out in front of them.
Since we’ve attached one of our toy’s arms out straight, let’s angle the other arm down at its side. First, sew along the side of the arm opposite from the side to be folded down or up—in our case, the top of the arm, since the bottom will be folded down. Use horizontal mattress stitch along the top of the arm, then turn the corner with a diagonal stitch, just as you would with a straight-out arm.
Now we’re on the front side of the arm. For the next stitch on the body, insert your needle under two stitches. Then, instead of inserting your needle under the bottommost stitch on the arm, insert it under the next stitch up.
Repeat this along the side of the arm, until you get to the part of the arm that should be flat against the body. (Since our arm is relatively small, we’ll repeat only once more.)
Now you’ve reached the bottom of the arm, or the armpit. Use horizontal mattress stitch to continue along the bottom, but for the stitches on the arm, now insert the needle under the third or fourth V-stitch from the base of the arm.
This will pull the arm downward.
Once you’ve finished with the armpit, continue up the back side of the arm, in the same way that you did with the front side: insert your needle through two stitches on the body, and through the second-from-bottom stitch on the arm.
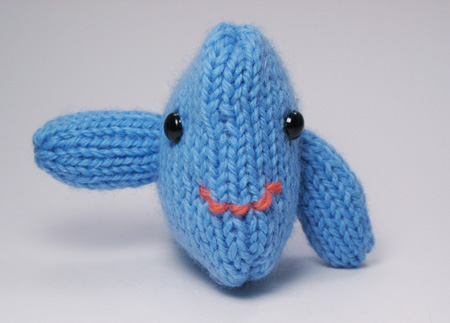
When you come back around to the top of the arm, you will end up with a nicely downward-pointed limb. And a new friend!
I hope this tutorial comes in handy to some people. I would greatly appreciate any feedback, and I’m happy to answer any questions in the comments.
