This is a free and easy pattern for everyone to enjoy. Please check out the Mochimochi Shop for more patterns that you’ll love!
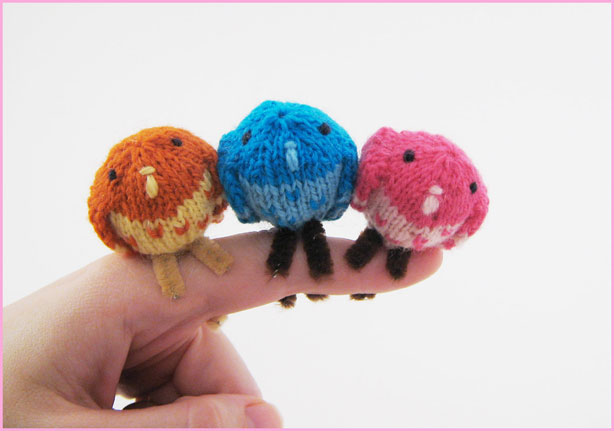
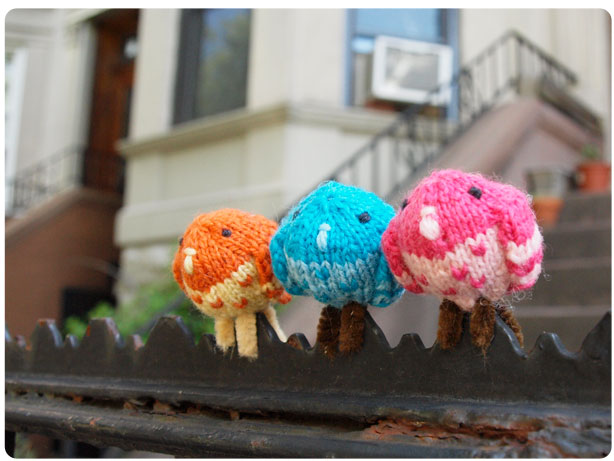
These cuties are so fast to knit, a flock of them will be hopping off your needles in no time!
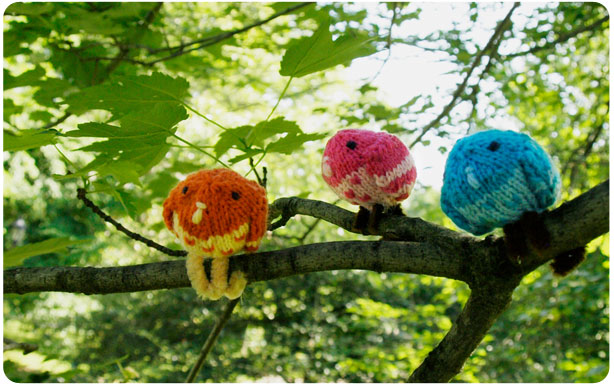
Unlike the real thing, everyone can love a knitted pigeon, so brighten up your local park or city block with some colorful new neighbors. Then snap a photo and add it to the Mochimochi Friends Flickr group!
Finished Size: About 1.25 inches (3 cm) tall
Yarn:
Fingering-weight yarn in 2 colors plus small amount of black
Samples made with Knit Picks Palette yarn:
Color 1 (lighter shade): 23718 (Blush), 23724 (Sky), 24558 (Custard)
Color 2 (darker shade): 24568 (Cosmopolitan), 24583 (Cyan), 24554 (Orange)
But any scrap yarn from a sock-knitting project will do! (You can also use thicker yarn and larger needles for a bigger bird.)
Needles: Set of size 1 US (2.25 mm) double-pointed needles
Other materials:
Small tapestry needle
Stuffing (I recommend polyester fiberfill, but yarn scraps will also work in a pinch)
Pipe cleaner
Gauge: Doesn’t matter, as long as your stitches are tight enough so that stuffing won’t show through them.
Abbreviations:
CO = cast on
rnd = round
k = knit
st(s) = stitch(es)
kfb = knit into front and back of stitch (increases by 1 stitch)
k2tog = knit 2 stitches together (decreases by 1 stitch)
st st = stockinette stitch (knit on right side, purl on wrong side)
p2tog = purl 2 stitches together (decreases by 1 stitch)
——– Pattern starts here! ——–
Body (worked bottom to top)
With Color 1, CO 6 sts onto 3 needles and join in a rnd.
Rnd 1: [kfb] 6 times (12 sts)
Rnd 2: [kfb, k1] 6 times (18 sts)
Rnd 3: knit
Rnd 4: [kfb, k2] 6 times (24 sts)
Rnds 5 and 6: knit
Rnd 7: [kfb, k3] 6 times (30 sts)
Rnds 8-12: knit (5 rnds)
Switch to Color 2.
Rnds 13 and 14: knit
Rnd 15: [k2tog, k3] 6 times (24 sts)
Rnds 16 and 17: knit
Rnd 18: [k2tog, k2] 6 times (18 sts)
Rnd 19: knit
Rnd 20: [k2tog, k1] 6 times (12 sts)
Stuff piece, then break yarn, and draw tightly through sts with tapestry needle.
Embroidered Features
With Color 1, embroider beak by making a vertical stitch about 3 sts down from top gathered sts. Stitch back over it once or twice more to thicken, then make a smaller horizontal stitch just above it.
With Black, embroider eyes on either side of beak, placed about 3 sts from top gathered sts and 4 sts to either side of beak.
Wings (make 2)
Turn body so that the top faces you, and with Color 2, pick up and knit 6 sts in a row, just above color change on body.
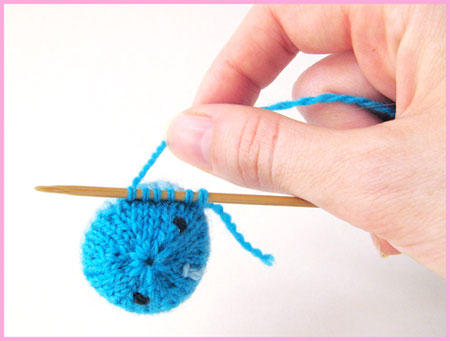
Note: Be sure that the bars between stitches that you use to pick up from are Color 2, and not Color 1.
Turn to work wing straight.
Row 1: purl
Row 2: k1, [kfb] 4 times, k1 (10 sts)
Rows 3-5: work 3 rows st st
Switch to Color 1 (without breaking Color 2).
Rows 6 and 7: work 2 rows st st
Switch to Color 2.
Row 8: k1, k2tog, k4, k2tog, k1 (8 sts)
Row 9: purl
Switch to Color 1.
Row 10: k1, k2tog, k2, k2tog, k1 (6 sts)
Row 11: purl
Switch to Color 2.
Row 12: k1, [k2tog] twice, k1 (4 sts)
Row 13: [p2tog] twice (2 sts)
Break yarn and draw tightly through sts with tapestry needle.
With end still threaded on tapestry needle, tack tip of wing down, next to cast-on sts of body.
Note: For the second wing, begin picking up stitches from the other direction (because you always pick up stitches from right to left).
Finishing
Cut two 2-inch (5 cm) pieces of pipe cleaner. (Cut longer pieces if you’ve made a bigger pigeon with thicker yarn, or if you want to be able to perch your pigeon on a thick railing or other large item.)
Insert one pipe cleaner into the small opening formed when you cast on for the body, and poke it back out a few stitches forward and to one side. Repeat with second pipe cleaner for the other foot, so that the two pieces cross.
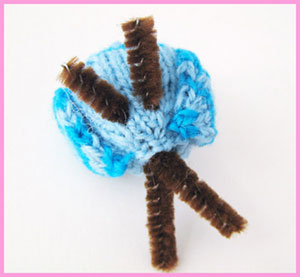
Bend the feet in a curve for perching.
With Color 2, embroider flecks onto breast with duplicate stitch. Or if you’re not familiar with this technique, you can just make little stitches with Color 2.
Weave in loose ends, then find a perch for your pigeon at home or release it into the wild!
© 2010 Anna Hrachovec / Mochimochi Land
Please do not copy or distribute any part of this pattern without permission.
Please do not sell items made from this pattern without permission.

Those birds are adorable. I think I have to make a whole flock of them now.
Oh so fantastic, very excited about you coming to London :D
wow! these are perfect!
I might make some in grey
Thanks for the cute free pattern!!
Oh how precious! Thank you!!!
Thank you so much! They are super cute! I want to knit a lot :-)
Super cute! When I’m done my current sweater pattern I have two different shades of red (ah dyelot) that would be super cute for this.
I can’t wait to make a whole flock of these!! Thanks for the pattern.
These are my de-stress knitting for when I’m not doing revision for my exams next week.
I’m making one in every different colour of the rainbow!!
These are so adorable!! Thanks for sharing the pattern :)
YAY!!! Im so excited to knit some!!! thank you so much for putting out the free pattern
I’ve just finished my first little blue guy! So cute! So quick! Pipe cleaner feet might be too big though, so i’ll have to think of some other way to perch him.
SO excited!!!! I ‘ve been waiting for a long time for a free tiny pattern. Can’t wait to see more!
Thank you sooo much for sharing this! I’m going to knit up little duos to put in tree branches at my wedding reception. SO cute!
Oh! LOVE! Thank you.
Oh my gosh!!! I love these so much! I HAVE to make these!
OK- I think you’ve made a convert out of me! Now I think I have to make a whole flock of bluebirds… VERY sweet
Thanks for the freebie! These little guys are so cute!
thank you! i love, love, love ’em!
Thank you so much–I am a convert to all your wonderful creatures. I LOVE LOVE LOVE THEM
Wow these are adorable and so timely, I’ve been wondering what to do with all my left-over fingering yarn.
these are SOOO cute ^..^ thanks for the pattern :)
Too cute! I HAVE to make a whole flock! Thanks for the free pattern!