
I recently finished up one of the trickier pieces for my upcoming show, and thought it would be fun to show a little step-by-step post about how I knitted this big guy.
(This isn’t a pattern, though—as you’ll see, I just figured it out as I went, and didn’t worry too much about counting rows, etc.)
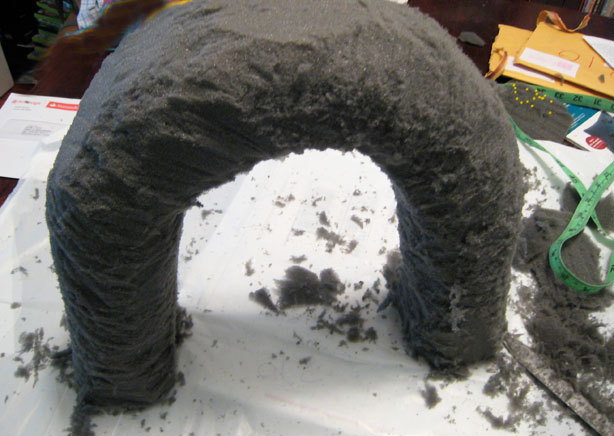
Step 1: Carve an arch shape out of a block of foam.
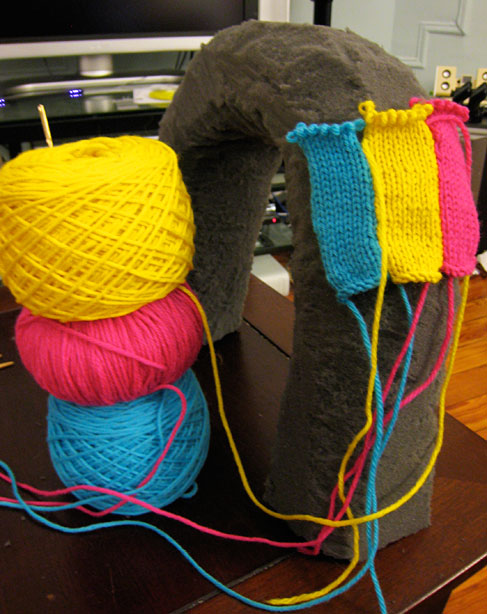
Step 2: Measure how big around the arch is, decide how many stripes you want in your rainbow, calculate how wide each stripe should be, and knit a few samples to check.
Step 3: The bend in this rainbow isn’t rainbow-y enough, so let’s see if stretching it out will have any lasting effect on the foam. (It does!)

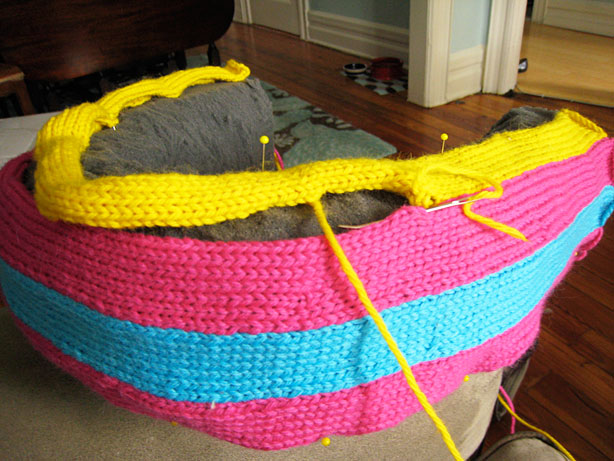
Step 4: Continue to knit some stripes until they are long enough to cover the length of the rainbow. (This knitting part takes forever, so you probably want to have a few movie rentals on hand.) Pin them in place.
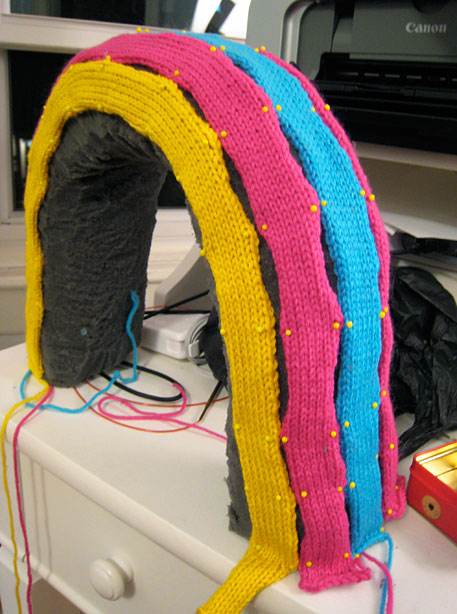
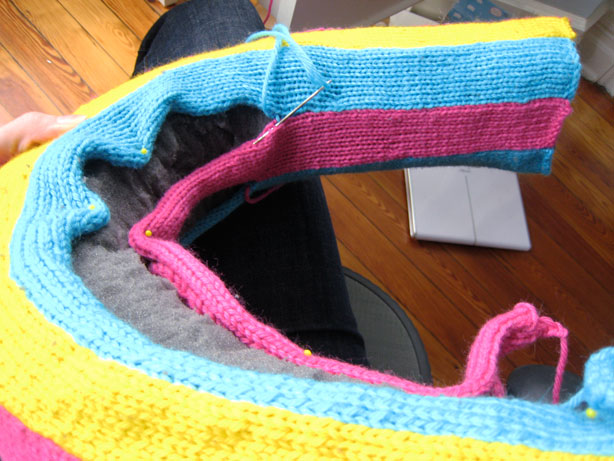
Step 5: Get out your tapestry needle, and let mattress stitch do its magic on the first couple of seams at the top. When you get to the more bend-y stripes at the side of the rainbow, think really hard, and decide that you need to make wider seaming stitches on the upper stripe and shorter stitches on the lower stripe in order to make them bend properly and conform to the foam shape.
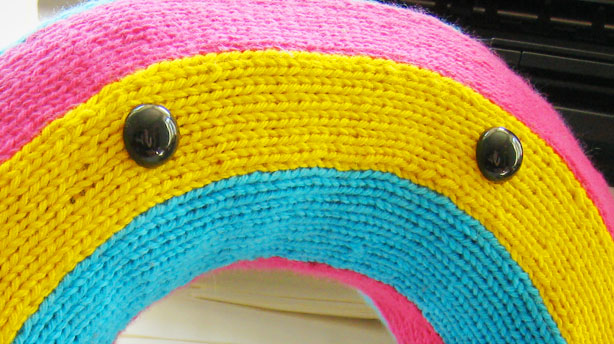
Step 6: Finish knitting, knitting, and knitting the rest of the stripes. (Have I ever mentioned that Radiolab is a great podcast to knit to?). Then, hold your breath as you sew up that last seam…
…and it actually worked! It’s a knitted rainbow, without funny scrunchy bumps!
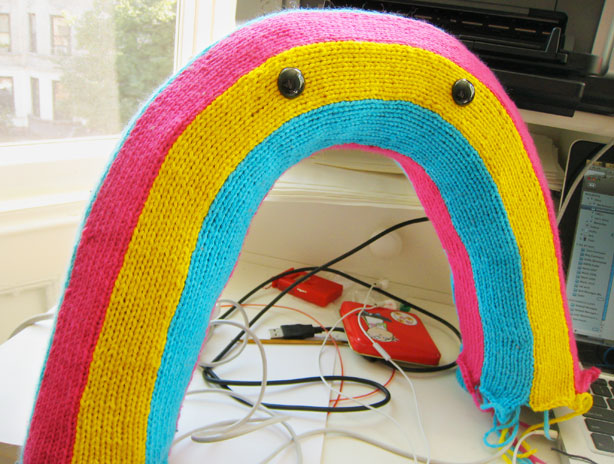
It was the hugest relief to know that I didn’t just waste four days of nonstop knitting making this guy. Now it’s onto knitting a herd of mini unicorns to slide down the rainbow. Also remaining are a river, a cloud, a possible cornfield, and tons more. Just about a month left to do it all!
You rock life… HARD.
thanks for such an interesting blog post. i love your creativity but am most impressed by your diligence. knitting takes time and designing takes more. and oh, the amount of finishing on knitted toys!
Nice! Love the colors you chose.
One Q: When you said “you need to make wider seaming stitches on the upper stripe and shorter stitches on the lower stripe in order to make them bend properly and conform to the foam shape” what did you mean?
Did you tension your mattress stitches or did you draw your yarn through more stitches on one stripe than the other?
Agh! I am having flashback to all of my mad deadline knits.
You rule, chickie. Keep going!
*cheereleads*
Deadly K xx
It’s awesome, Anna! Brava!
Thank you for the support, everyone! As my arm muscles are starting to give out just a tiny bit, the encouragement is very nice.
Miki – I slipped the tapestry needle under more stitches on the upper stripe, but not for every stitch that I made- I really just adjusted as I went, and somehow it worked out pretty well.
i love it!
perfect colours too
x
fantastic!! … doing any leprechauns or pots of gold?
YAY!!!! UNICORNS!!!!!
Amazing and Beautiful!!
:O This is amazing! I love it! :)
Wow! Nothing like a deadline to clear the mind. Looks great!
I love it!! Thanks for sharing how you made the rainbow…it turned out great! I can’t wait to see the mini unicorns :)
Fabulous! You should think about actually making it a pattern in the future=)
Radiolab is the best!!! I also really like The Moth podcast as well as the standards (this American life and wait wait dont tell me) snap judgement is another good podcast.
Oh and you rock and I love the rainbow! :-)
I’ve thought about gold, and also clouds for the rainbow’s feet to rest on… I need to lay everything out soon and see how it comes together – then I’ll decide what to add next!
whoa…. !!! it’s starting to look like a “triple rainbow”!!!
Very cool. I love seeing your process for this huge project!
great,love it ,you are very creative
You need some mini Pots of Gold to go at the end of the rainbow aswell! And perhaps a leprachorn :)
Am glad it turned out as you wanted it. :D
Am looking forward to seeing your unicorns
I just found you through whipup.net and though I don’t knit (I “knift”), I am completely inspired by what you’ve done! I love the trainset! Totally going to follow your blog =)