
I just got an email from someone who wanted some clarification on how to join the feet in the Mochimochi Reindeer pattern. It’s a very simple method, but not so simple to explain in words. Since I also use the same basic method for the Ninjabun and the Woodins patterns, it occurred to me that others might like a quick visual guide. Here goes!
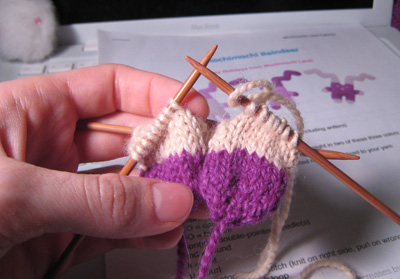
I’m starting at the point at which you have two finished feet, and you’re ready to join them together. I find it easiest to first divide the stitches of each foot onto two needles.
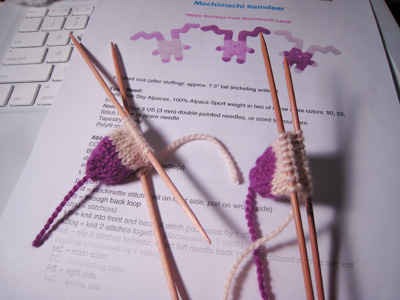
Next, work across the first half of stitches in the foot that has the yarn attached to it. Once you’ve worked these stitches, cast on additional stitches, if the pattern calls for any, using backward loop method.
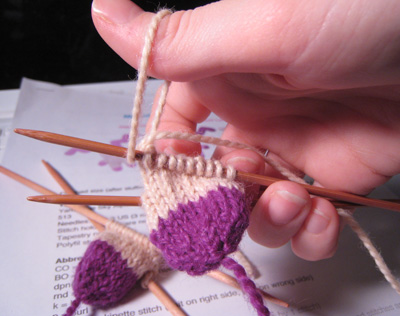
Now pick up the other foot, and begin knitting across it, starting with what would be the first stitch in the round if the yarn were still attached to that foot.
Below is a top view, showing the working strand of yarn on the right and the cut yarn (held up) attached to the last stitch on the foot.
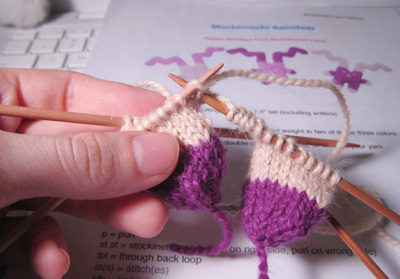
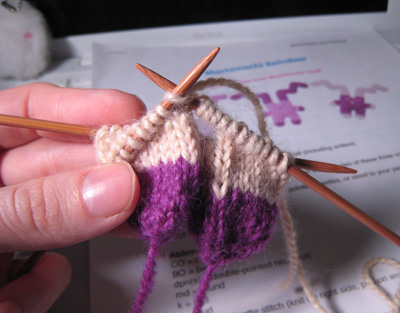
Continue to knit all the way around the foot, ending with the stitch with the cut yarn. You can twist the cut yarn around your working yarn or weave it into the stitches later.
Now you’re on the “back” side of the feet. Cast on additional stitches, if required, in the same way as on the front side.
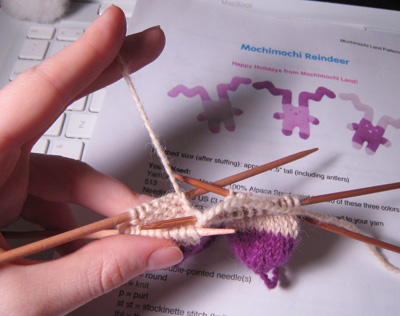
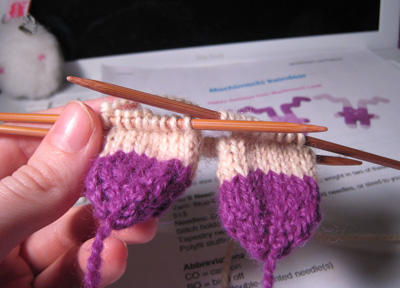
Finally, continue to work across the remaining stitches—the second half of the stitches from the foot you started with.
You’re now ready to continue working the stitches in one big round. You will end up with a gap between the feet, which you can stitch up at the finishing stage of the toy.
I hope this mini-tutorial is helpful to some people. I just wrote this up quickly, so if you have any questions, please leave them in the comments!
I was wondering about the gap as well. Glad I’m doing it right!
I’m also wondering, did you have a way that worked best for you in terms of dividing the stitches on your needles? Mine are currently divided onto four, with only six stitches on each “side” needle, but that seems awkward. I feel like when I put more on the sides, though, the middle hole stretches out way too much. So then I tried one needle for each leg front and back…but that is also awkward. They seem to flop everywhere.
Maybe the lesson here is that dpns are just awkward if it’s not a perfectly round shape and I should just keep knitting till I’m higher up and it doesn’t matter so much?
Good question, Heather!
Double-pointed needles can be pretty awkward, especially in your first few rounds of knitting, or when joining multiple pieces together as in the example here. But you’re right – as you continue knitting in the round, your knitting will start to look more circular and feel more natural.
I know some people like to keep the same number of stitches on each needle, but for myself, I usually just have a stitch marker at the beginning of the round, and use as many needles as feels most comfortable. In the case of the reindeer, after dividing the stitches onto two needles for each foot, I switch to having my stitches all on just three needles once I join them together. That hole in the middle may be stretched a bit for the first couple of rounds, but it will all ease up as you go, and since you’ll sew it up later anyway, it’s not a big deal.
If you’re concerned about having a “stripe” of looser stitches where you switch needles, then it’s good to shift the stitches around the needles as you work, so that the knitting will be even all around in the end.
Anna, thank you so much for explaining this with pictures–it was very helpful! I made a Woodin, and had to redo this part over and over so many times. At one point, I had an inside out foot. ;) Using two needles instead of just one for the first leg looks very helpful.
Thank you Anna! This was very helpful last night when Ninjabun was getting his feet. :)
Thank you so much for posting this! I would have found this incredibly helpful when working on Ann Budd’s Father Christmas pattern. I was so frustrated with the legs, that I simply made two and made the body separately, attaching them later. Your directions and photos are perfect. Thank you!